
Ingest users from apps you developed
Learn how to collect user data via SDK from the applications you developed.
 View as Markdown
Collect and unify user data from your applications using Krenalis SDKs. Whether mobile, desktop, server-side, CLI, or IoT devices, each SDK lets you track events and identify users to maintain a consistent customer view.
For integrating Krenalis with websites and web apps, see the websites integration.
Prerequisites
Before you start, make sure you have:
- Access to your app's codebase and configuration.
- A basic understanding of the programming language your app uses.
These will help you install the Krenalis SDK and connect your app without issues.
Steps
1. Connect an application
Create a source connection for your app:
- Go to the Sources page in your Krenalis workspace.
- Click Add a new source ⊕, then select the card for your platform or language.
- Click Add source....
- (Optional) Rename the connection if needed.
- Click Add to confirm.
The new source connection appears under Sources in the sidebar and can be reopened at any time.
2. Set up your application
Depending on your application's environment, install or import the Krenalis SDK for your platform.
Android
-
Add the dependency to your
build.gradle:Kotlin
repositories { mavenCentral() }
dependencies { implementation 'com.krenalis.analytics.kotlin:android:<latest_version>' }
Java
repositories { mavenCentral() } dependencies { implementation 'com.krenalis.analytics.kotlin:android:<latest_version>' } -
Add the following permissions to your
AndroidManifest.xmlif not already present:<!-- Required for internet. --> <uses-permission android:name="android.permission.INTERNET"/> <uses-permission android:name="android.permission.ACCESS_NETWORK_STATE"/> -
Import and use the SDK:
💡 You can find the event write key in Krenalis inside the Android source connection in Settings → Event write keys.
Kotlin
import com.krenalis.analytics.kotlin.android.Analytics
import kotlinx.serialization.json.buildJsonObject
import kotlinx.serialization.json.put

val client = Analytics("YOUR_WRITE_KEY", applicationContext) {
    endpoint = "YOUR_ENDPOINT"
    trackApplicationLifecycleEvents = true
    flushAt = 3
    flushInterval = 10
    // ...other config options
}

client.identify(
    "703991475",
    buildJsonObject {
        put("email", "emily.johnson@example.com");
        put("plan", "Enterprise");
        put("company", "Acme Corp");
        put("jobTitle", "Product Manager");
        put("country", "United States")
    },
)
Java
import com.krenalis.analytics.kotlin.core.Analytics;
import com.krenalis.analytics.kotlin.android.AndroidAnalyticsKt;
import com.krenalis.analytics.kotlin.core.compat.JavaAnalytics;
import kotlin.Unit;

AndroidAnalytics client = AndroidAnalyticsKt.Analytics("YOUR_WRITE_KEY", getApplicationContext(), configuration -> {
    configuration.setEndpoint("YOUR_ENDPOINT");
    configuration.setTrackApplicationLifecycleEvents(true);
    configuration.setFlushAt(3);
    configuration.setFlushInterval(10);
    // ...other config options
    return Unit.INSTANCE;
});

JavaAnalytics analyticsCompat = new JavaAnalytics(client);

Map<String, Object> traits = new HashMap<>();
traits.put("email", "emily.johnson@example.com");
traits.put("plan", "Enterprise");
traits.put("company", "Acme Corp");
traits.put("jobTitle", "Product Manager");
traits.put("country", "United States");
analyticsCompat.identify("703991475", traits);
iOS
-
Add the Krenalis SDK for iOS to your project.
In your
Package.swift, add the following dependency:dependencies: [ .package(url: "https://github.com/krenalis/analytics-swift", from: "<latest_version>") ]Then add
Krenalisas a dependency of your target:.target( name: "YourApp", dependencies: [ .product(name: "Krenalis", package: "analytics-swift") ])Or, in Xcode, go to File → Add Package Dependencies... and enter the repository URL.
-
Import and use the SDK:
💡 You can find the event write key in Krenalis inside the iOS source connection in Settings → Event write keys.
import Krenalis

let analytics = Analytics(configuration: Configuration(writeKey: "YOUR_WRITE_KEY")
    .endpoint("YOUR_ENDPOINT")
    .trackApplicationLifecycleEvents(true)
    .flushAt(3)
    .flushInterval(10))

analytics.identify(userId: "703991475", traits: [
    "email": "emily.johnson@example.com",
    "plan": "Enterprise",
    "company": "Acme Corp",
    "jobTitle": "Product Manager",
    "country": "United States"
])
.NET
- In Krenalis, open your .NET source connector → Settings → Event write keys.
- Copy the event write key and endpoint.
- Install the package:
dotnet add package Krenalis.Analytics --version <version> - Initialize the client:
using Krenalis;
using Krenalis.Model;

var config = new Config().SetEndpoint("<endpoint>");

Analytics.Initialize("<event write key>", config);

Analytics.Client.Identify(
    "703991475",
    new Dictionary<string, object>
    {
        { "email", "emily.johnson@example.com" },
        { "plan", "Enterprise" },
        { "company", "Acme Corp" },
        { "jobTitle", "Product Manager" },
        { "country", "United States" }
    },
    new Options().SetAnonymousId("ac3496a8-0782-4173-856f-2f7dd37d7f14")
);

Analytics.Client.Flush();
Analytics.Client.Dispose();
Node.js
The Node SDK can be imported with import into Node projects, using ES6 modules.
- In Krenalis, open your Node.js source connection → Settings → Event write keys.
- Copy the event write key and endpoint.
- Install the SDK:
npm install @krenalis/nodejs-sdk --save - Import and use it:
import Analytics from '@krenalis/nodejs-sdk';

const client = new Analytics('<event write key>', '<endpoint>');

client.identify({
    anonymousId: "ac3496a8-0782-4173-856f-2f7dd37d7f14",
    userId: "703991475",
    traits: {
        "email": "emily.johnson@example.com",
        "plan": "Enterprise",
        "company": "Acme Corp",
        "jobTitle": "Product Manager",
        "country": "United States"
    }
});
Java
- In Krenalis, open your Java source connection → Settings → Event write keys.
- Copy the event write key and endpoint.
- Add
com.krenalis.analytics.javatopom.xml:<dependency> <groupId>com.krenalis.analytics.java</groupId> <artifactId>analytics</artifactId> <version>LATEST</version> </dependency> - Import and use the SDK:
import com.krenalis.analytics.Analytics;
import com.krenalis.analytics.messages.IdentifyMessage;

Map<String, String> traits = new HashMap();
traits.put("email", "emily.johnson@example.com");
traits.put("plan", "Enterprise");
traits.put("company", "Acme Corp");
traits.put("jobTitle", "Product Manager");
traits.put("country", "United States");

final Analytics analytics =
    Analytics.builder("<event write key>")
        .endpoint("<endpoint>")
        .build();

analytics.enqueue(
    IdentifyMessage.builder()
        .anonymousId("ac3496a8-0782-4173-856f-2f7dd37d7f14")
        .userId("703991475")
        .traits(traits));
Python
- In Krenalis, open your Python source connection → Settings → Event write keys.
- Copy the event write key and endpoint.
- Install the SDK:
pip3 install git+https://github.com/krenalis/analytics-python - Import and use the package:
import krenalis.analytics as analytics

analytics.write_key = '<event write key>'
analytics.endpoint = '<endpoint>'

analytics.identify(
    user_id='703991475',
    anonymous_id='ac3496a8-0782-4173-856f-2f7dd37d7f14',
    traits={
        'email': 'emily.johnson@example.com',
        'plan': 'Enterprise',
        'company': 'Acme Corp',
        'jobTitle': 'Product Manager',
        'country': 'United States'
    }
)
Go
- In Krenalis, open your Go source connection → Settings → Event write keys.
- Copy the event write key and endpoint.
- In your Go module, go get the
"github.com/krenalis/analytics-go"package:go get github.com/krenalis/analytics-go - Import and use the package:
import "github.com/krenalis/analytics-go"

client := analytics.New("<event write key>", "<endpoint>")
client.Enqueue(analytics.Identify{
    AnonymousId: "ac3496a8-0782-4173-856f-2f7dd37d7f14",
    UserId:      "703991475",
    Traits: analytics.Traits{
        "email":    "emily.johnson@example.com",
        "plan":     "Enterprise",
        "company":  "Acme Corp",
        "jobTitle": "Product Manager",
        "country":  "United States",
    },
})
3. Debug the events
Use the Event debugger in your source connection to verify that events are received correctly.
-
In Krenalis, open your source connection.
-
Go to the Event debugger tab.
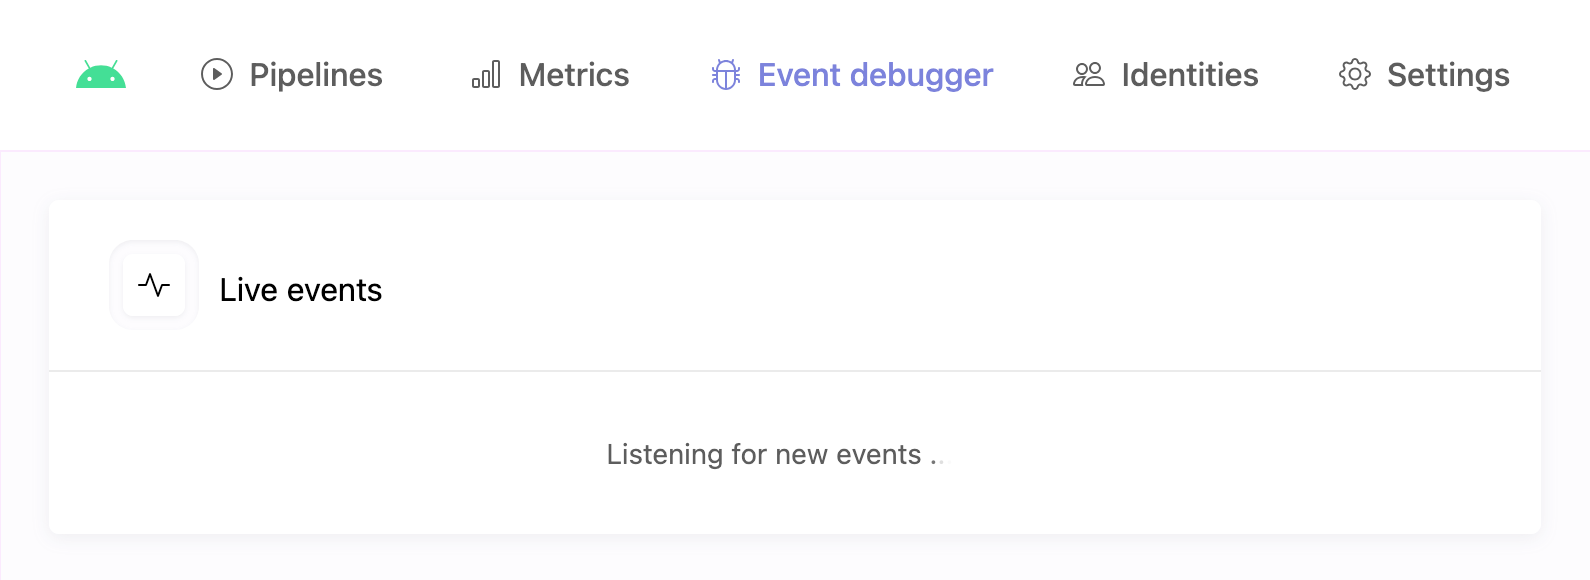
It shows a live sample of the most recent events received for this source connection. Use it whenever you need to quickly confirm that events are arriving as expected and to inspect their contents in real time.
-
Run your application and trigger the code that calls
identify. The event should appear almost immediately: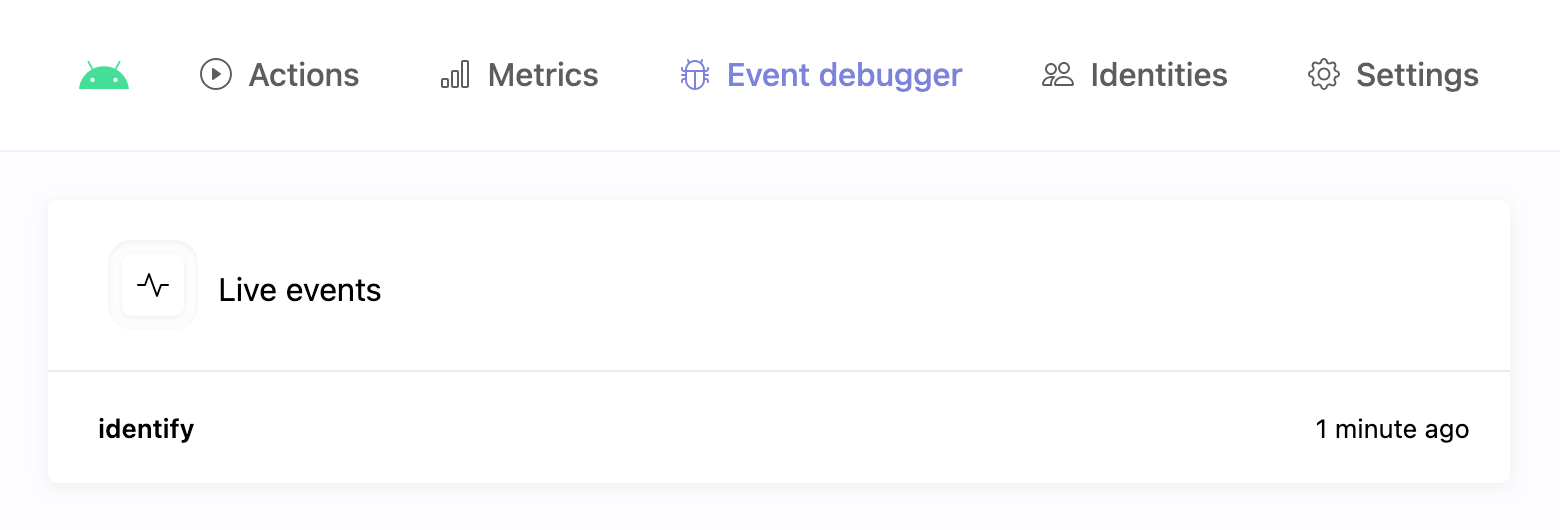
-
Click the collected event in the Event debugger list to view its JSON payload, which contains the data sent by your app.
The following example shows what a typical event payload looks like:
{
    "anonymousId": "b27c5d9f-92a7-4d30-b21a-4df21a6872c2",
    "context": {
        "browser": {
            "name": "Safari",
            "version": "17.2.1"
        },
        "ip": "172.91.24.57",
        "library": {
            "name": "krenalis.js",
            "version": "1.0.0"
        },
        "locale": "en-US",
        "os": {
            "name": "macOS",
            "version": "14.5"
        },
        "page": {
            "path": "/dashboard",
            "title": "User Dashboard",
            "url": "https://app.example.com/dashboard"
        },
        "screen": {
            "width": 3024,
            "height": 1964,
            "density": 2
        },
        "session": {
            "id": "1766272512048"
        },
        "timezone": "America/Los_Angeles",
        "userAgent": "Mozilla/5.0 (Macintosh; Intel Mac OS X 14_5) AppleWebKit/605.1.15 (KHTML, like Gecko) Version/17.2.1 Safari/605.1.15"
    },
    "messageId": "f9189a52-b37b-4d7d-9f2d-08b91d85fa9c",
    "receivedAt": "2025-10-20T16:15:24.340Z",
    "sentAt": "2025-10-20T16:15:24.327Z",
    "originalTimestamp": "2025-10-20T16:15:23.992Z",
    "timestamp": "2025-10-20T16:15:24.010Z",
    "traits": {
        "email": "emily.johnson@example.com",
        "plan": "Enterprise",
        "company": "Acme Corp",
        "jobTitle": "Product Manager",
        "country": "United States"
    },
    "type": "identify",
    "userId": "703991475"
}
If no event appears after a few seconds:
- Check your application logs for errors.
- Ensure your event write key and endpoint are correct.
💡 See the Event spec for full details on the event schema.
4. Add a pipeline to import user data
-
Click on the Pipelines tab of the connection for Android.
-
Next to the Import users into warehouse pipeline, click Add pipeline....

This is an "Import users" pipeline type, which transfers identified user profiles from your application into your warehouse.
Each pipeline defines how and when user data flows from your source into the warehouse. You can add multiple pipelines per connection to handle different data segments or destinations.
5. Filter events
The filter selects which users to import based on the collected events:
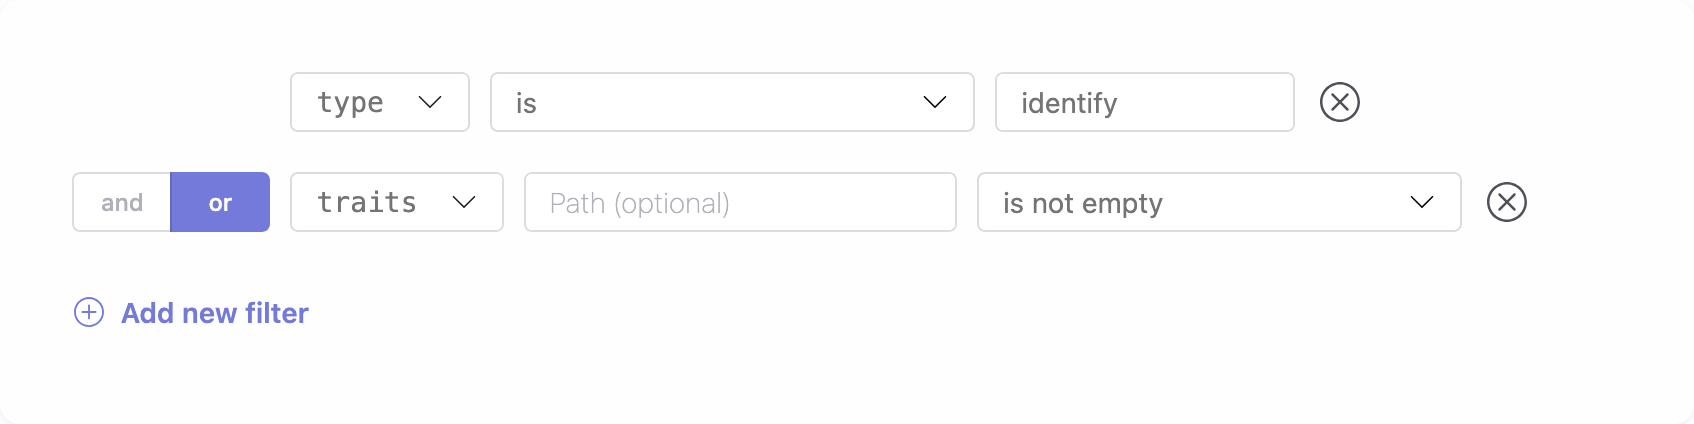
It is preset to import user data only if the event is of type identify—with or without traits—or if it is not an identify event but includes traits. For now, you can leave it as configured. It's recommended to adjust this filter only after you've gained experience with event handling.
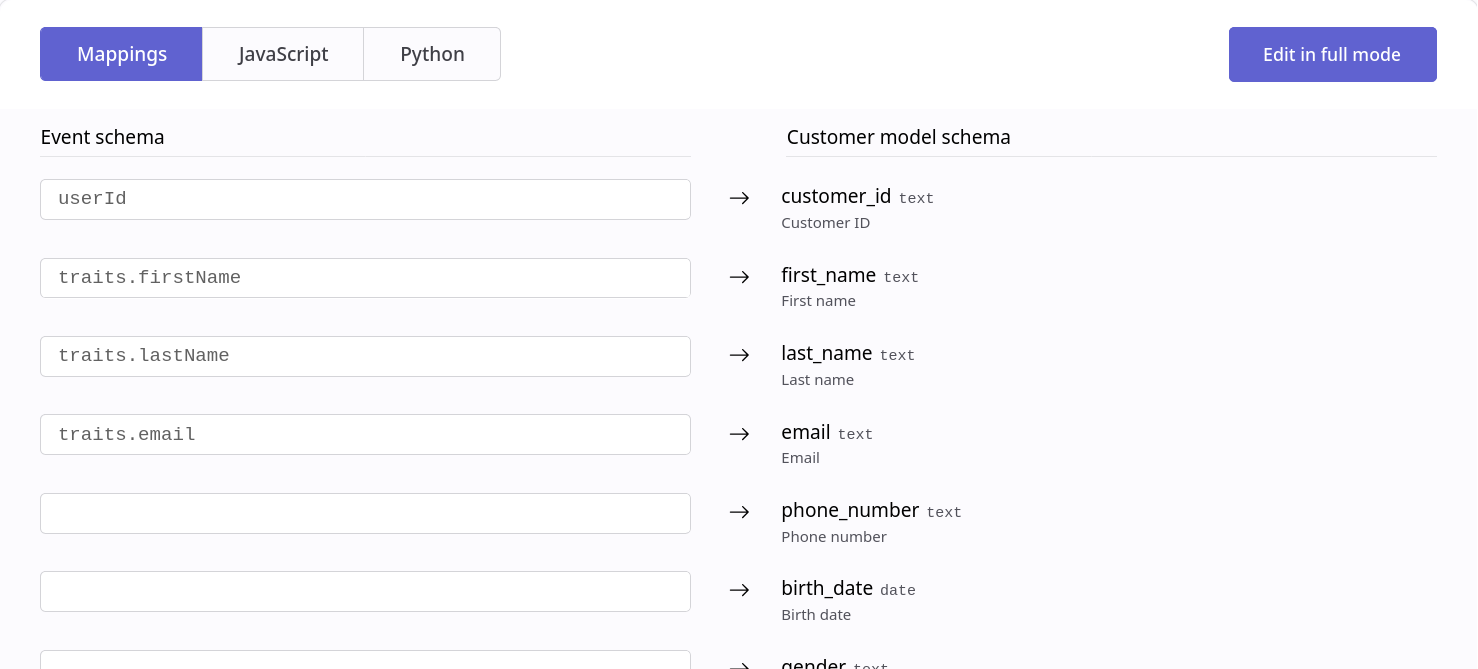
6. Transformation
The Transformation section lets you populate your Customer Model properties using user traits from collected events. You can choose between a Visual Mapping interface or advanced transformations written in JavaScript or Python.
You have full control over which properties to map—assign only those relevant to your business context and leave others unassigned when no matching values are available.
For complete details on how transformations work for harmonization, see how to harmonize data.
7. Save your changes
When you're done, click Add (or Save if you're editing an existing pipeline).
The new pipeline will appear in your source connection and can be edited or disabled at any time.
Pipelines
Once saved, the new pipeline appears in the pipelines list for Android. From here, you can monitor imports, adjust filters, and manage transformations. Each pipeline defines how and when users flow you apps into your warehouse.

| Column | Description |
|---|---|
| Pipeline | Name and description of the pipeline. |
| Filter | Condition that determines which events are processed. If not set, all events are included. |
| Enable | Switch to activate or deactivate the pipeline. When disabled, no events are processed. |
| Manage | Edit settings such as filter and transformation. |
| ⋮ (More) | Additional options, such as deleting the pipeline. |