
Activate customer profiles via databases
Learn how to synchronize customer profiles with a database for activation.
 View as Markdown
Krenalis makes it easy to sync customer profiles from your data warehouse to a database table. By connecting an external database, you can keep every customer profile up to date—no manual exports or scripts required.
How it works
- Choose where to sync. Pick a table in your database. Krenalis supports PostgreSQL, MySQL, ClickHouse, and Snowflake.
- Select your audience. Decide which customer profiles should stay up to date.
- Map the data. Match each property from your Customer Model to the columns in your table using Visual Mapping, JavaScript, or Python.
- Set the schedule. Choose how often Krenalis should run the synchronization.
- Keep it fresh. Krenalis automatically updates your table, adding new rows whenever new profiles appear.
The result: your database always mirrors your customer data, ready for activation in any tool you connect next.
Steps
1. Connect a database table
- Go to the Destinations page of your Krenalis workspace.
- Click on Add a new destination ⊕ and click on the card corresponding to your database.
- Click on Add destination ...
Enter the connection details for the database. You can then specify which destination table, within the database defined here, should be synchronized. It is recommended to use a user account with access restricted solely to the specified database and, if possible, only to the table or tables that will be synchronized.
PostgreSQL
| Field | Description |
|---|---|
| Host | Hostname or IP address of the database. |
| Port | Port used to connect (default is 5432). |
| Username | Username for authentication. |
| Password | Password associated with the username. |
| Database name | Name of the database. |
| Schema | Name of the schema within the database. |
MySQL
| Field | Description |
|---|---|
| Host | Hostname or IP address of the database. |
| Port | Port used to connect (default is 3306). |
| Username | Username for authentication. |
| Password | Password associated with the username. |
| Database name | Name of the database. |
ClickHouse
| Field | Description |
|---|---|
| Host | Hostname or IP address of the database. |
| Port | Port of the native ClickHouse protocol. (9000 default; 9440 with TLS). |
| Username | Username for authentication. |
| Password | Password associated with the username. |
| Database name | Name of the database. |
Snowflake
| Field | Description |
|---|---|
| Account Identifier | Account ID of the Snowflake warehouse in the form <orgname>-<account>. |
| User Name | Username used to authenticate with Snowflake. |
| Password | Password associated with the provided user name. |
| Role | Role that will be used for accessing the data in Snowflake. |
| Database | Name of the database. |
| Schema | Name of the schema within the database. |
| Warehouse | Name of the virtual warehouse to execute the query. |
Before clicking Add, you can test the connection by clicking Test connection. The connection you just created is a destination connection. You can access it later by clicking Destination section in the sidebar.
2. Add a pipeline to export profiles
In the new connection for PostgreSQL, click Add pipeline... next to the Export users pipeline.

Each pipeline tells Krenalis which data to send and how to structure it in the target table. This makes it possible to maintain different sync rules or export subsets of data to multiple tables.
3. Filter profiles
If you don't want to synchronize all profiles with the database table, use filters to select which profiles to export. Only profiles that match the filter conditions will be exported. If no filters are set, all profiles will be exported. For more information on how to use filters, see the Filters documentation.

4. Specify the destination table
Enter the name of the table to synchronize, the table must already exist, and click on Confirm.

5. Select the matching column
Select the column in your table that will be used for matching. Krenalis uses this column to match profiles during synchronization. If a row with the same key already exists, it is updated. If no matching row is found, a new row is created.
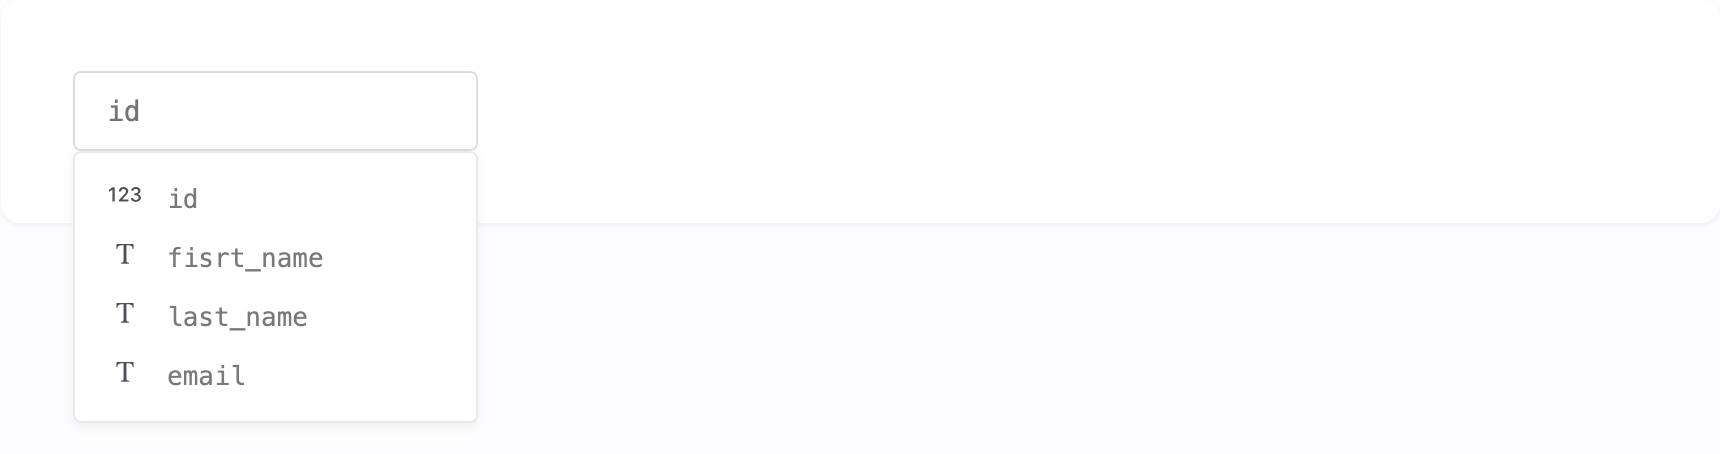
The key column ensures that data stays consistent and prevents duplicate entries. Choose a column that contains a unique, stable identifier—for example, a customer ID, user ID, or email address. Avoid columns that can change over time, such as names or phone numbers.
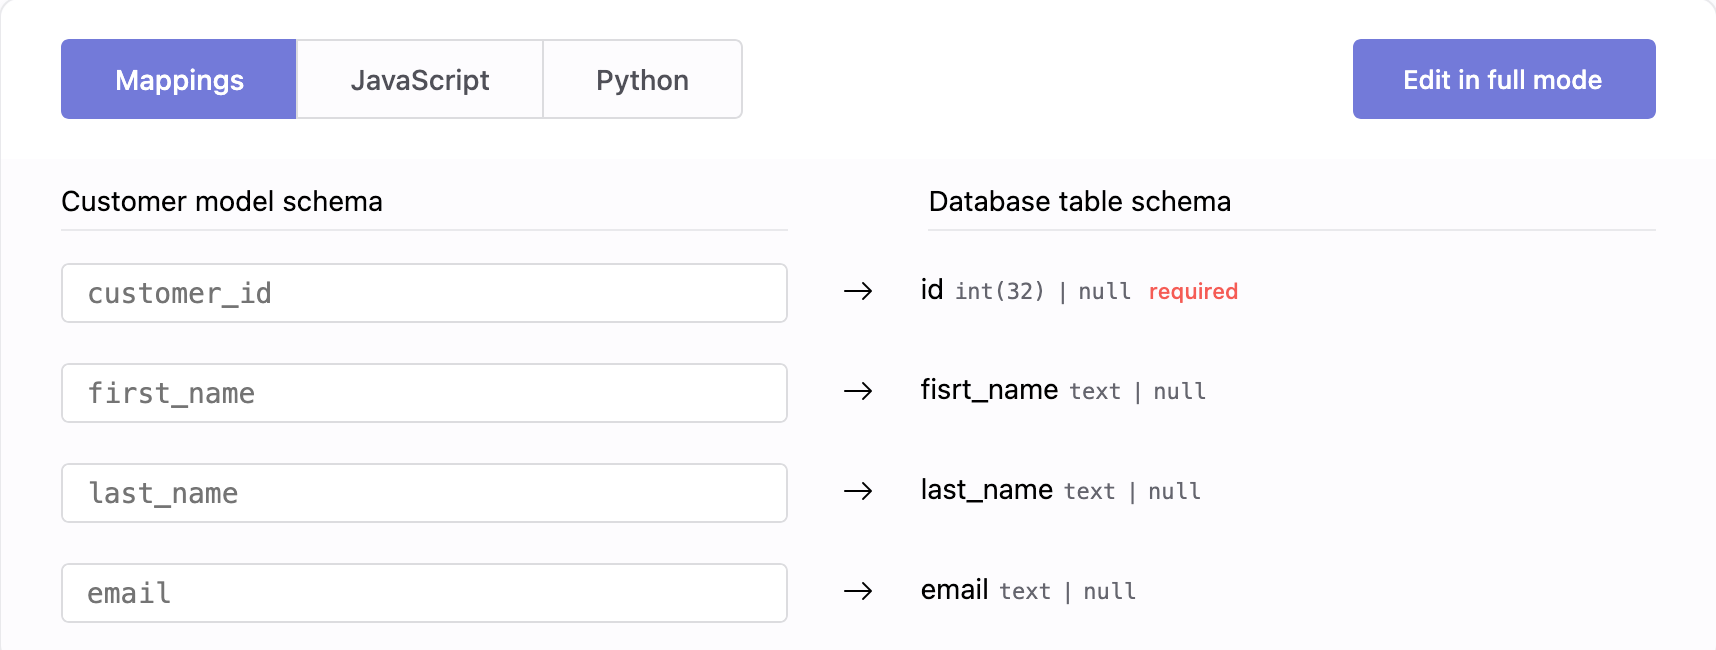
6. Transformation
Use the Transformation section to decide how customer data is written into your table. You can visually map fields from the Customer Model to columns, or use JavaScript and Python for more advanced logic (for example, formatting dates or combining multiple properties).
Well-defined transformations ensure your exported data matches the structure and conventions of your database.
7. Save your changes
When you're done, click Add (or Save if you're editing an existing pipeline). The new pipeline will appear in the connection page.
Pipelines
Once saved, the new pipeline appears in the pipelines list for PostgreSQL. From here, you can monitor export, adjust filters, and manage transformations. Each pipeline defines how and when profiles flow from your warehouse to PostgreSQL.
With a single PostgreSQL connection, you can create multiple export pipelines to sync data with different tables in the same database, or with the same table using different Customer Model mappings.

| Column | Description |
|---|---|
| Pipeline | Name and description of the export pipeline. |
| Filters | Conditions used to select which profiles are exported. If not set, all profiles are included. |
| Enable | Switch to activate or deactivate the export pipeline. When disabled, the pipeline will not run, even if a schedule is defined. |
| Run now | Run the export immediately, one time only. Available only when the pipeline is enabled. |
| Schedule | Frequency of automatic exports. You can also run the export manually at any time. |
| Manage | Edit settings such as filter, table name, key column, and transformation. |
| ⋮ (More) | Additional options, such as deleting the pipeline. |